Best Perfmatters Settings and Its Setup with Popular Cache Plugins
Are you looking for the best Perfmatters settings to get the greatest results? If you are, I have got you covered. This post will show the best Perfmatters settings and configurations with three popular caching plugins.
It’s not optional to optimize your WordPress website for speed. Speed optimization is mandatory since it affects the overall user experience and ranking. Apart from choosing a good hosting provider and a lightweight theme, a performance improvement plugin can help you with the task.
Perfmatters, in my opinion, is one of the most lightweight and simple-to-use performance plugins you can employ to take your website’s speed to the next level.
Perfmatters: An Introduction
If you’ve been blogging or using WordPress for a while, you’ve probably heard about Perfmatters. It’s one of the best and lightest performance improvement plugins.
Perfmatters also provides fantastic features that most bloggers and WooCommerce store owners feel are useful. Some of the key features of Perfmatters are:
- Limiting post revisions
- Hosting Google Fonts locally
- Locally hosting Google Analytics code
- Modifying the WordPress heartbeat
- Disabling emoji, dashicons, and embeds
- WooCommerce optimization
And more.
In a nutshell, it provides excellent speed improvement features as well as a few security options.
Regarding the pricing, Perfmatters does not offer a free version. As a result, you can’t get it from the WordPress plugin repository.
It is a full-featured premium plugin. The single-site license starts at $24.95 per year. When you’re just getting started, a single-site license would be ideal. Their top-tier subscription allows you to use the plugin on an unlimited number of sites.
You now understand what Perfmatters is. Next, let’s look at the best Perfmatters settings you can get.
Best Perfmatters Settings to Improve Pagespeed: Recommended Configuration
The Perfmatters plugin has an easy-to-use dashboard, which you can see under the WordPress settings section.
General Settings
Inside the General Settings, you can see every main configuration option. Here are the settings I use and recommend:
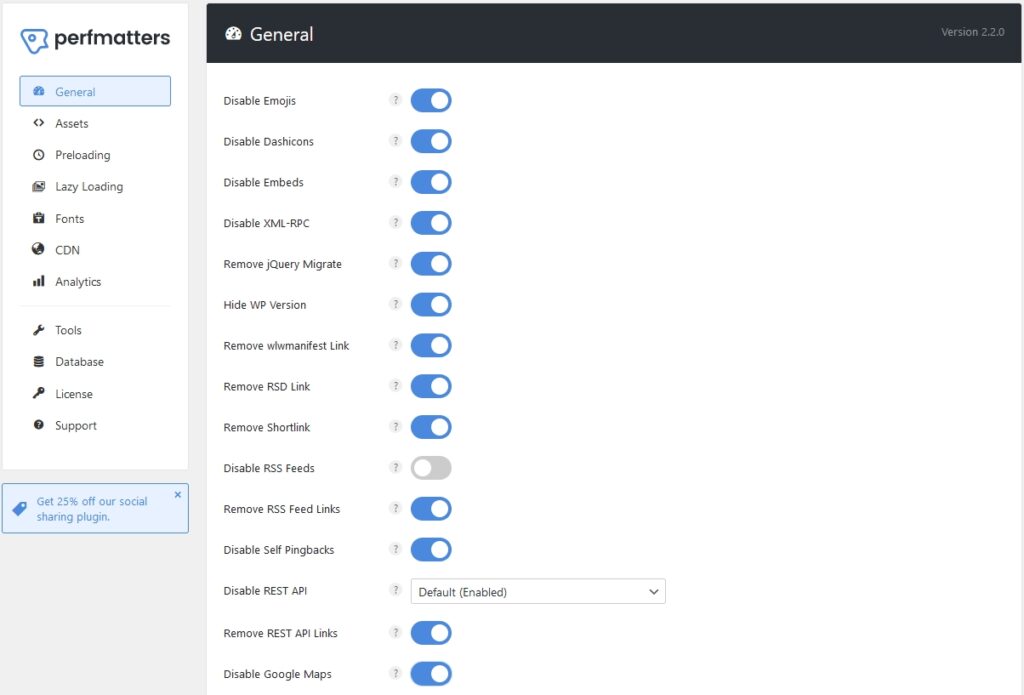
- Disable Emojis: ON – removes a JS file needed for emojis (use Unicode instead). Some cache plugins disable emojis by default (FlyingPress, WP Rocket) in which case, leave off.
- Disable Dashicons: ON – prevents admin icons from loading on the frontend. If it breaks your site, leave it off and use the script manager to disable them where they’re not used.
- Disable Embeds: ON – when you paste a URL into your WordPress editor, this loads a pretty preview (from YouTube, Facebook, Tweets, etc). If you don’t need this, disable it.
- Disable XML-RPC: ON – bad for speed + security (used to publish content from mobile).
- Remove jQuery Migrate: ON – if you’re using a page builder, leave off. Perfmatters also has documentation on dealing with jQuery using the script manager, defer, delay, and preload settings. You could also use code snippets to only load jQuery on specific pages.
- Hide WP Version: ON – improves security by hiding WP version from showing publicly.
- Remove wlwmanifest Link: ON – you likely don’t use Windows Live Writer, so disable.
- Remove RSD Link: ON – used to edit your site in a browser instead of blog clients.
- Remove Shortlink: ON – disable if you’re using the “post name” permalink structure.
- Disable RSS Feeds: OFF – only enable this if you don’t have a blog on your website.
- Remove RSS Feed Links: ON – removes unnecessary links in your RSS feed to pages, posts, comments, categories, tags, etc. This removes a small amount of unused code.
- Disable Self Pingbacks:- ON – disables pingbacks when linking to your own blog.
- Disable REST API: disable when logged-out – hides usernames to improve security, but disabling it can lead to errors with plugins, so disable when logged out or for non-admins.
- Remove REST API Links: ON – removes a short line of code created by the REST API.
- Disable Google Maps: OFF – some themes & plugins have the Google Maps API built-in with no option to disable this, in which case you can disable Maps if you don’t use them.
- Disable Password Strength Meter: ON – removes a file that can sometimes load on your website when it should usually only load on account, checkout, and password reset pages.
- Disable Comments: OFF – you probably don’t want to disable your blog comments.
- Remove Comment URLs: ON – disables comment author links which are often spam.
- Add Blank Favicon: OFF – only used for speed testing purposes on fresh WP installs.
- Remove Global Styles: ON – removes 311 lines of unminified code which seemed to be added by mistake to WordPress core. It was originally added to improve duotone styles.
- Heartbeat: only allow when editing posts/pages – recommended by Perfmatters. This disables Heartbeat unless you’re editing content, then set the Heartbeat Frequency to 60s. This reduces Heartbeat and reduces requests/CPU usage by only enabling it when needed.
- Limit Post Revisions: 5 – gives you a few backups of old posts in case you need to restore a post to an earlier version, but prevents too many revisions from bloating your database.
- Autosave Interval: 5 minutes – increase frequency to reduce CPU and save resources.
- Change Login URL: add a custom login URL – blocks unwanted requests from bots & attackers by moving wp-login. If using QUIC, keep the default URL since it has features to protect it. You can also change the redirect/message when the default login URL is viewed.
Assets Settings
The Assets Settings comes with three major options.
- Script manager
- JavaScript optimization
- CSS optimizations
Let’s see how to optimize the code correctly.
Script Manager
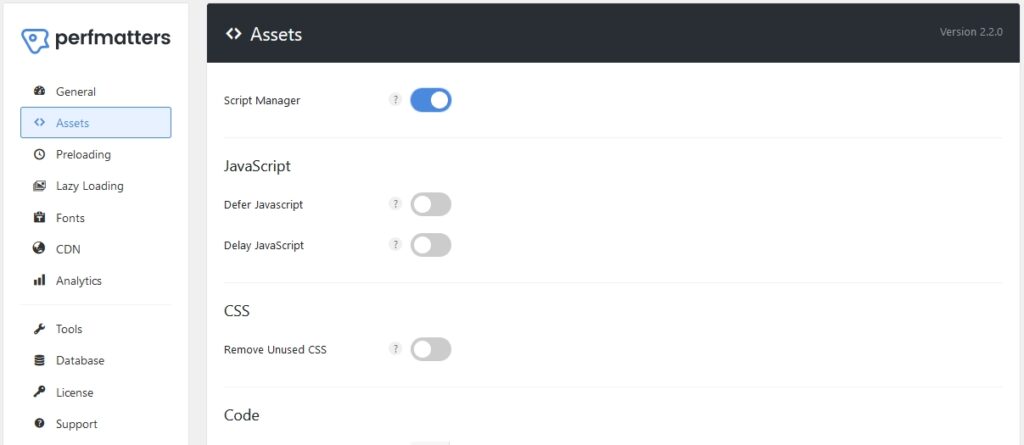
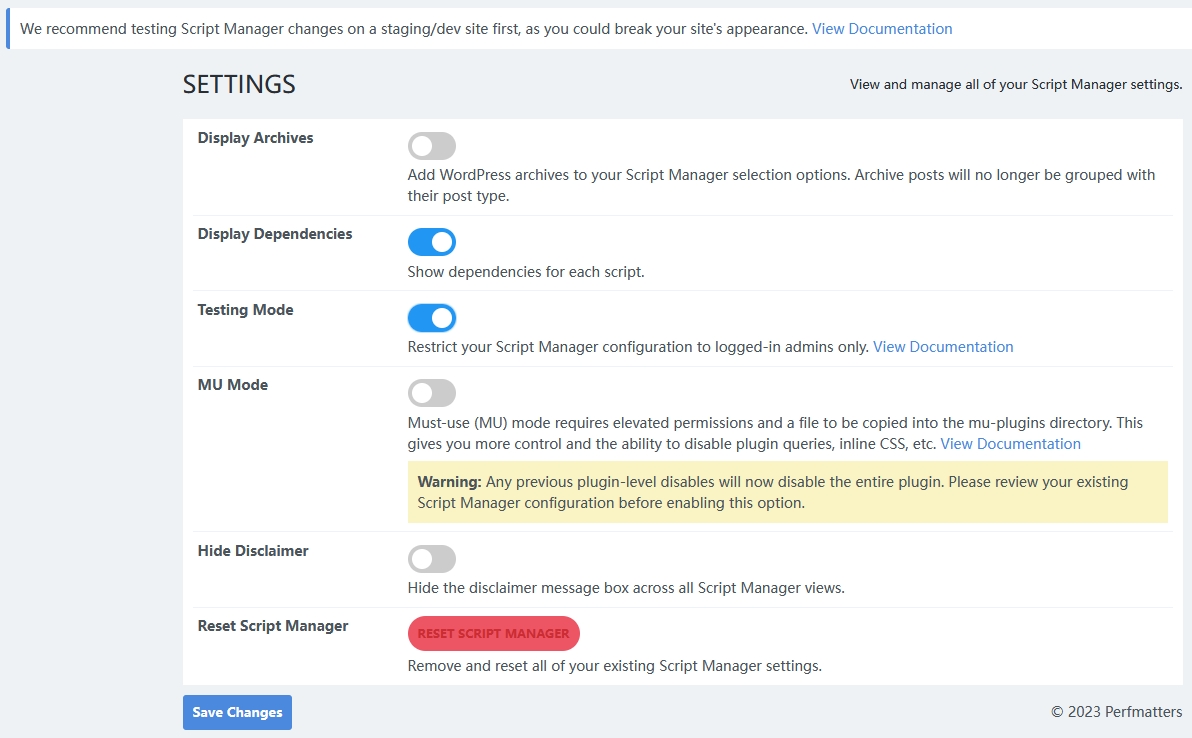
Script manager is a powerful feature. When you need to take care of the JS executions individually, enable the script manager setting. These are for advanced users. You can remove unnecessary code from the website using this option.
After enabling it, go to the website’s front end. You will see a new option called Script Manager on the top bar.

Enable the display dependencies and test mode once you have opened the Script Manager settings.
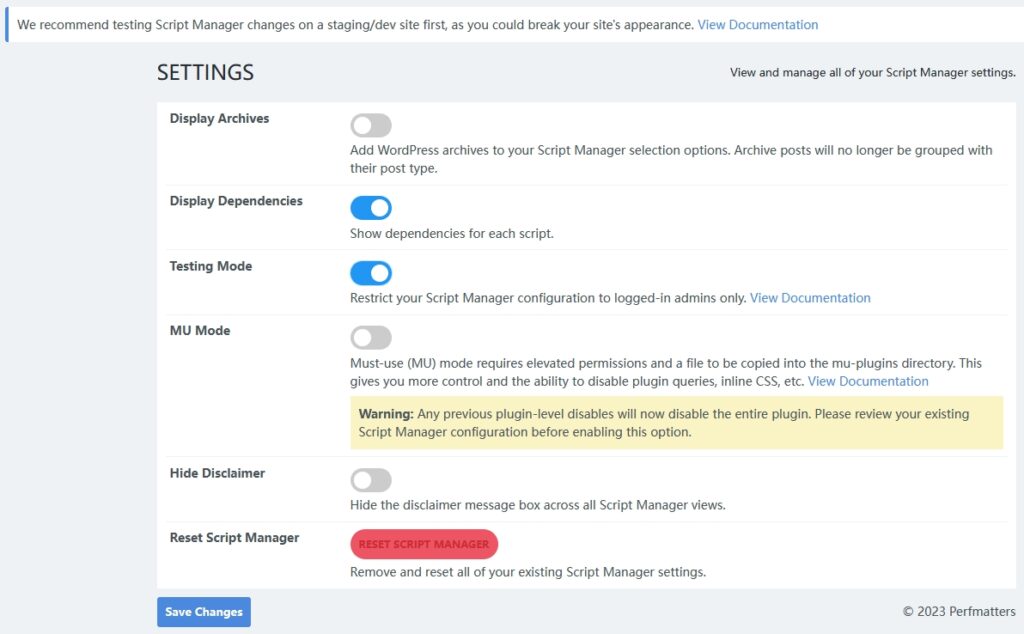
Now, you can control JavaScript usage. For example, I have installed the WPForms Lite plugin. As I only display the forms on the contact page, I can eliminate the JS code everywhere else.

Similarly, you can configure your WordPress website and optimize the JavaScript executions. Now if you scroll to the bottom, you can see all the plugin that uses jQuery.

jQuery is known for slowing down the website. Look for lightweight alternatives if you have many plugins that rely on jQuery. By doing these optimization techniques, you can eliminate unnecessary features and improve the website’s loading times.
Next, move to the JS options.
JS settings

- Defer JavaScript: Enable – It can fix render-blocking JavaScript.
- Delay JavaScript: Enable – This option delays JavaScript code and gives you optimal performance. When you use third-party advertising networks like Google AdSense or Media.net ads, I highly recommend delaying the JavaScript execution. The feature will also help you with Google Maps optimization.
- Delay behavior: Delay all Scripts – Delaying all scripts would be the best option. From the same settings, you can exclude some theme-specific JS features. When you get some error on the front end, excluding only specific JS files would be the best choice.
- Delay timeout: 10 seconds – Perfmatters recommends 10 seconds delay time as the best option.
If you choose the delay-only specific scripts option, enter these values in the box and save the settings.
ga( ‘
ga(‘
google-analytics.com/analytics.js
analytics.js
gtagv4.js
analytics-minimal.js
/gtm.js
/gtag/js
gtag(
/gtm-
adsbygoogle.js
fbevents.js
fbq(
/busting/facebook-tracking/
CSS settings
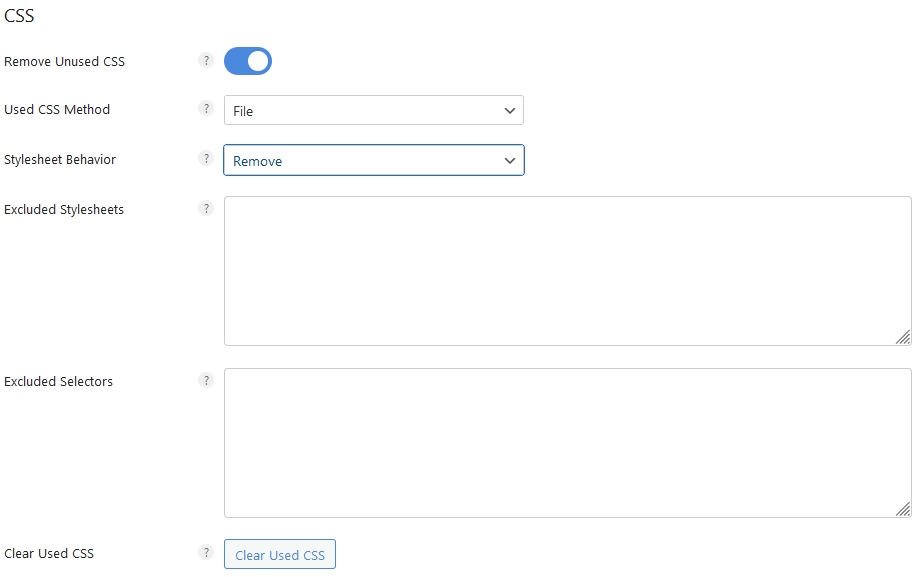
Remove unused CSS: Enable – To optimize the website, you should remove unused CSS. Most WordPress caching plugins like WP Rocket come with this feature. But instead of using WP Rocket’s CSS removing feature, I recommend using Perfmatters. On the other hand, if you use FlyingPress, it is okay. You can use FlyingPress’s unused CSS removing option.
Used CSS method: File – The file method is better if you care about the user experience.
Stylesheet behavior: Remove – Removing is the ideal option. But sometimes, it can break your website. So, ensure the website runs fine in the front end after finalizing the settings.
Clear unused CSS: If you have made changes to the styling without seeing them, use this feature.
Preloading Settings
Here are the preloading settings I use and recommend:
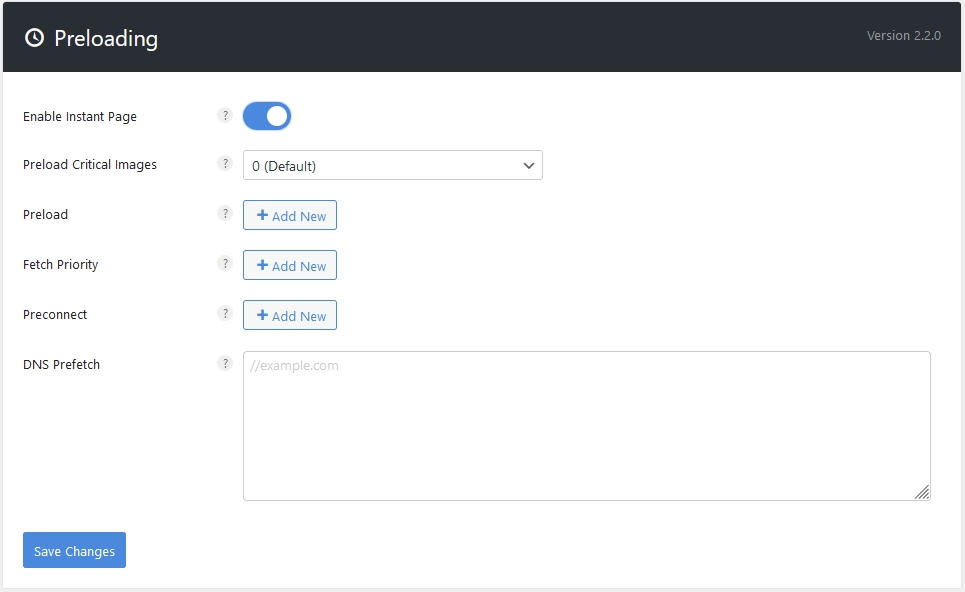
- Enable instant page: Enable – When the visitors hover the mouse over links, the page will get downloaded instantly. Hence, when they click, the page will be served immediately. To increase the user experience, this is a good option.
- Preload: You can preload multiple files like documents, audio, embed, font, image, object, track, etc. You need to mention the file path and select the type. Once you are done, save the settings.
- Preload critical images: 2-3 images – To preload the above-the-fold photos, use this feature.
- Preconnect: Enter the domain names – You can add the CDN and third-party custom font URLs in this field. Most caching plugins like WP Rocket come with this feature. So, use only one tool for domain preconnecting.
- DNS prefetch: Enter the domain names – If your website calls third-party domains for files such as Google Ads or Media.net ads, you should add these domains to the DNS prefetching option.
Lazy Loading Settings
Lazy Loading is an excellent way to improve the load time of images. I have enabled the lazy load images option on all of my websites. Here are the settings I recommend:
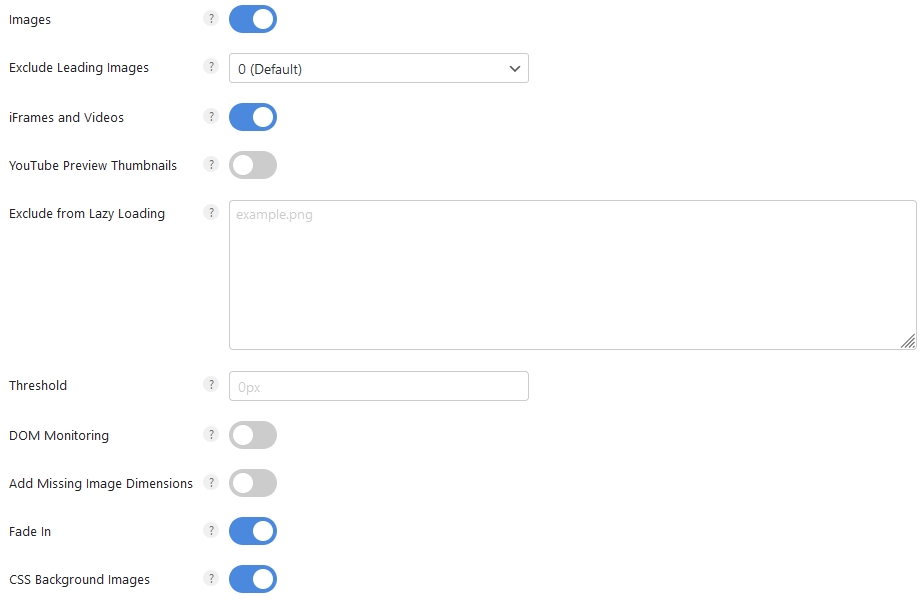
- Images: Enable – This is the first thing you must do in the lazy loading settings. Once enabled, all the photos will be optimized with the lazy loading technology.
- iFrames and Videos: Enable – Apart from images, you can also enable lazy loading for images and iFrames. Highly recommended, so turn it on.
- YouTube preview thumbnails: Enable – Instead of displaying the YouTube media player, we can replace it with a preview thumbnail. It is a best practice to get the optimal performance.
- Exclude from lazy loading: Optional – If you need to exclude specific images from lazy loading, use this option. You can enter the file’s name (one per line) to exclude them from using the lazy loading technology.
- Threshold: 0px – For a better scrolling experience, use 0px as the threshold.
- DOM monitoring: Disable – If you are not using infinite scrolling, disable it.
- Add missing image dimensions: Disable – Most WordPress caching plugins can do this. Hence, you can disable this option in Perfmatters settings. If your cache plugin doesn’t come with this feature and you need to add the correct image dimensions, enable it.
- Fade in: Enable – It is an effect you see while the images are loading up. It is highly recommended.
- CSS Background images: Enable – Instead of allowing page builder plugins to call background images right through the CSS file, Perfmatters can do this via HTML – it can speed up the process and optimize the images.
Fonts Settings
Optimizing the font’s delivery will help you improve the page speed. Perfmatters comes with a dedicated fonts option. Here are the best perfmatters settings you can use for the task.
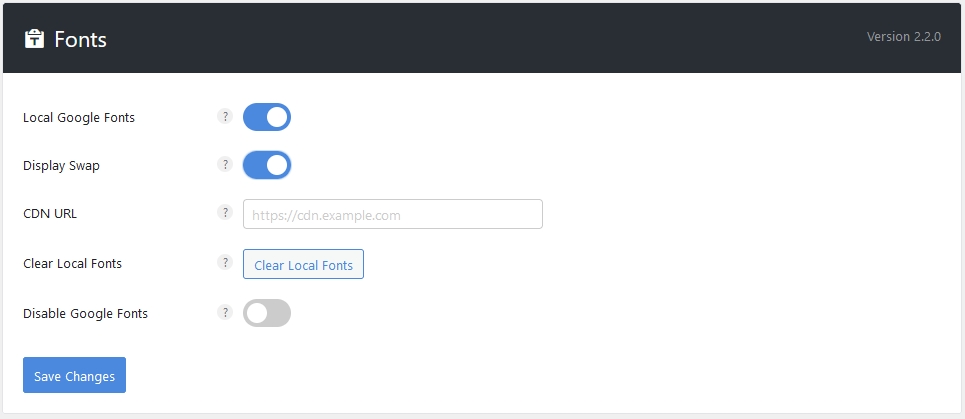
Local Google Fonts: Enable – Fetching Google Fonts from the external server will result in additional HTTP requests and can affect performance. Enable this feature to host all the Google Fonts you use inside your server or a CDN. This way, you can reduce the server load.
Display Swap: Enable – To add the font-display: swap property to your CSS, enable this option. Adding this CSS property will help you improve the core web vitals.
CDN URL: Optional – If you use a CDN for your website and the fonts serve through the CDN, enter the URL here. This is an optional setting. If you do not have a dedicated CDN path, leave this setting empty.
Clear Local Fonts: Optional – This option removes all the existing fonts and stylesheets from your local server. You do not need to use this feature often. When there are any issues with the fonts or stylesheets, I recommend clearing the local fonts.
Disable Local Fonts: Optional – If you are not using Google Fonts on your website and using system fonts for maximum performance, you can disable Google Fonts through the Perfmatters settings. Remember enabling this option will disable Google Fonts from your entire website. I recommend keeping this feature disabled.
CDN Settings
After configuring the font settings, move to the CDN section. CDN settings are easy to configure and won’t take much time. Here are the settings you need to configure.
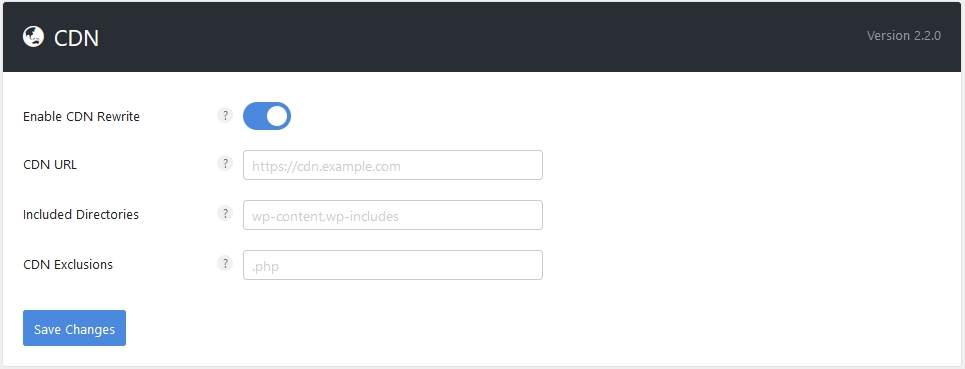
- CDN rewrites: Enable – If you use a CDN on your website, enable this option.
- CDN URL: Enter the URL – In this space, enter the URL of the CDN.
- Included directories: Mention the folders – If you need to add custom folders to the CDN, use this field. By default, the Perfmatters plugin will add wp-contents and wp-includes to the included directories list. If you do not have any custom folders to include, leave this setting empty.
- CDN exclusions: Mention file extensions – This option excludes specific file types from CDN. You can add .php and .xml in the field.
Once you are done with the CDN settings, move to the next one,
Google Analytics
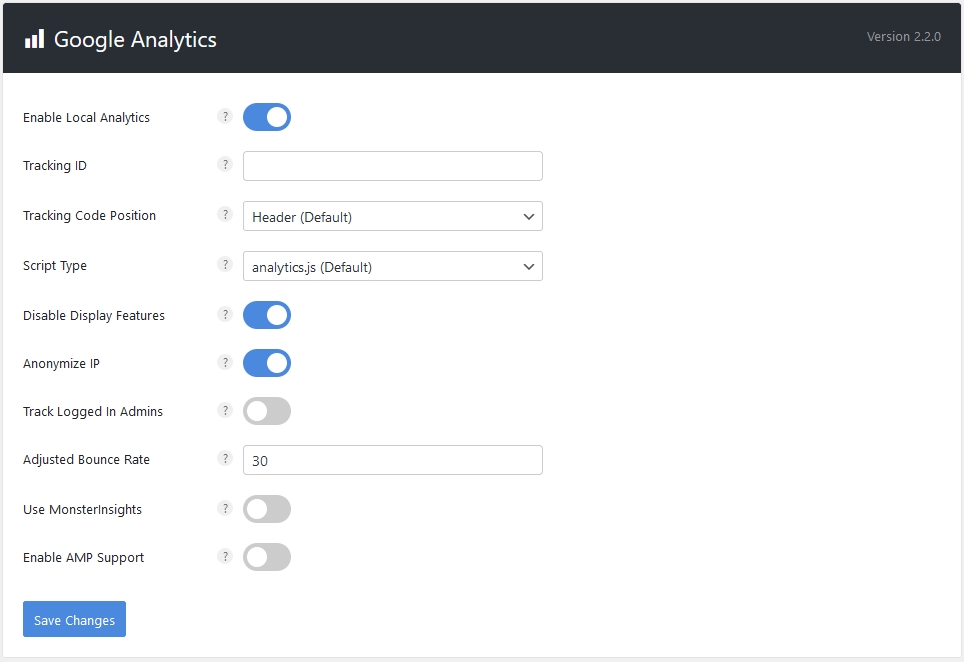
Google Analytics is a great tool to understand your visitor’s behavior and how they interact with your website. Here are the ideal Perfmatters settings to optimize the Google Analytics integration.
- Enable local Analytics: Enable – This is the main configuration option you need to enable. Enabling this will help you host Google Analytics locally on your server, reducing third-party HTTP requests.
- Tracking ID: Enter Your Unique ID – Once you have enabled the local Analytics feature, enter your tracking ID here. This is how you can host Analytics locally on your server.
- Tracking code position: Header – Do you want to improve your website’s loading times? You can load the analytics script in the header or footer. The placement won’t affect the performance or tracking.
- Script type: analytics.js or minimal – Choosing the analytics.js or minimal script would be feasible if you prefer a quick speed boost. These scripts will disable certain data from the Analytics. The main GA script is heavy. Hence, disable scripts/ remove unnecessary scripts to make your website load faster.
- Disable display features: Enable – You must use Page Speed Insights to check for additional requests to DoubleClick. If there are HTTP requests to DoubleClick, enable this option.
- Anonymize IP: Enable – To comply with GDPR (in some countries), enable this option. This option will help you shorten the IP address.
- Track logged-in admins: Disable – When you log in as admin, you will be visiting multiple pages in the front end. Keeping it disabled will help you get more accurate data (focusing only on third-party visitors).
- Adjusted bounce rate: 30 – When a visitor stays at least 30 seconds and leaves, Google Analytics won’t consider it a bounce. This is highly recommended.
- Use MonsterInsights: Optional – If you use the MonsterInsights plugin to host Google Analytics locally, enable this option. Otherwise, keep it disabled.
- Enable AMP support: Disable – I won’t recommend using AMP. So, turn it off. You can enable this option if you are using AMP on your website.
That’s it!
If you use these settings on your website, you can spot a quick improvement in the overall website’s performance.
Configuration with Popular 3 Caching Plugins
This section will show you the Perfmatters plugin configuration you can do with three popular caching plugins.
The caching plugins I am going to use are:
- WP Rocket
- FlyingPress
- LiteSpeed Cache
Let’s see how to configure the plugin for the best results without any further ado.
Configure Perfmatters with WP Rocket
While using it with WP Rocket, the Perfmatters duplicate options you can disable are:
- Disable emojis
- Heartbeat Control
- Defer JS
- Delay JS
- Remove unused CSS
- Links preloading
- Preconnect
- DNS prefetch
- Lazy loading for images, videos, and iFrames
- Adding missing image dimensions
- Font-display: swap
- Database optimization
Instead, use these Perfmatters options:
- Every other option other than heartbeat control and emojis
- Script manager
- Preloading CSS
- Preloading JS
- Preloading every other file
- CSS background images
- Hosting Google Fonts locally
- Hosting Google Analytics locally
Configure Perfmatters with FlyingPress
While you use FlyingPress, disable these Perfmatters options:
- Emojis
- Delay JS
- Defer JS
- Remove unused CSS
- Links preloading
- Lazy loading images, videos, or iFrames
- Preloading critical images
- CSS background images
- Add missing image dimensions
- Preconnect CDN URL
- Database optimization
- Hosting Google Fonts locally
- Font-display: swap
Next, use these Perfmatters options:
- Every other option in the General settings
- Script manager
- CSS preloading
- JS preloading
- Every other file preloading
- Hosting Analytics locally
- Econnect third-party fonts
Configure Perfmatters with LiteSpeed Cache
If you are a LiteSpeed cache user, disable these Perfmatters options:
- Disable emojis
- Delay JS
- Defer JS
- Remove unused CSS
- DNS prefetch
- Lazy loading images, videos, and iFrames
- Add missing image dimensions
- Links preloading
- Preconnecting Google fonts
- Excluding above-the-fold images from lazy loading
- Database optimization
- Hosting Google Fonts and Analytics locally
- Font-display: swap
Now, you can enable these options and improve the speed:
- Script manager
- CSS background images
- Preload CSS
- Preload JS
- Preload any other files
- All the other general settings (except duplicate options)
Conclusion
Perfmatters is a great WordPress plugin. I use and highly recommend the tool. With the suitable Perfmatters settings, you can seamlessly improve the website’s overall speed.


